At the end of a project, you will require a record drawing that the building owner retains to refer to in the future. In the construction industry, we call these as-built drawings.
Contractors and facility guys will use as-built drawings to understand the construction of the building. It becomes a valuable tool when issues occur that need correction.
You can use the as-built drawing to identify where an issue may originate from.
When you look at a finished building, there’s typically a lot of work you can’t see. We have record drawings to help us track different system parts for troubleshooting purposes.
But here’s the twist, the design drawings you get from the engineer must go through a process before being considered as-built.
The actual construction rarely matches the design drawings, so you must record the changes during construction.
The process by which we record these changes is considered redline drawings.
This article will examine redline drawings and how you can create one yourself. I’ll provide you with some examples so you can get a better understanding of the process.
First, let’s look at a definition for redline drawings.
What are Redline Drawings?
Redline drawings or redline markups are the processes of using a red pencil to mark up shop or design drawings to display field changes. These changes are decisions made in the field; you’ll record them for the as-built drawings. How a contractor might build something can differ from what the engineer envisions, so using redlines helps record this.
Why are Redline Drawings Used?
We use redline drawings because it is one of the most effective ways to track changes during construction. Thankfully, the industry is evolving, so we’re beginning to see more efficient ways to keep track of field changes.
One of the standard methods of performing redlines is to have a full-size (24” x36”) set of drawings at your job. With this set, you’ll redline mark it as needed and you must keep track of its location.
As a contractor with multiple projects going on at once, managing a physical redline drawing set can be a challenge. People misplace things all the time, and while it’s ideal for keeping the drawing at the job site, this is where it is most likely to get lost.
Then you’re in trouble.
We see new technology arriving, and we can perform all our redlines digitally with the current state of tablets.
Companies such as Autodesk are bringing us software to view and markup your shop drawings or construction drawings from your tablet. Your team can then view these, and allows for collaboration.
You eliminate the headache of keeping track of a physical version of the redline drawings.
With redline drawings, you can take that to turn them into as-built drawings. So, the accuracy of your redlines must be there, or you’ll turn over inaccurate drawings to your customer.
Now that you know about redline drawings and why we use them, let’s look at the benefits.
The Benefits of Using Redline Drawings
There are three main benefits that I want to discuss when it comes to redline drawings. It consists of the following:
Each can save you both time and money on your project, these are the most valuable resources on any construction job.
Reduce Errors
At the end of a project, you want to provide your customer with an accurate final set of as-built drawings. After all, most projects require this as one of the close-out documents.
If the as-built matches your shop drawings exactly, then I would question the accuracy of the record drawings. It’s hard to believe that the design or shop drawing is 100% going to match the field installation.
Sure, you could tell me that no one will review the as-built drawings in that detail, but do you want to turn over something inaccurate to a customer? The project has your name and the company’s; you don’t want to give yourself a bad reputation.
Increased Efficiency
Redlines make the process of creating as-built drawings much more efficient. Instead of figuring out all the changes at the end of the job, why not document them throughout?
Properly maintaining a set of redline drawings will make your life much easier at the end of a job. All you’ll need to do is hand over the markups to your drafter to update the drawings accordingly.
Not only is it more efficient to document the changes throughout the project, but your record drawings will be much more accurate.
As I mentioned, some work sections get covered as construction progresses. If you don’t capture the change when you have a view of it, you might forget it, and you’ll be guessing on the record drawings.
Improved Quality Control
Redline drawings improve quality control because you’ll provide an accurate as-built drawing showing your attention to detail on a project.
When I see redlines, it’s because the person performing the work is thinking about the functionality of the design. If they begin to question something, they may decide to perform the work how they see fit.
If you’re worried about whether they’re making changes correctly, I’ll say that typically, only the more experienced guys will change something. Some younger guys don’t know better and just install per the design.
Issues usually occur when the construction work performed is based on poor design. Design issues rarely go unnoticed, but it does occur.
How to Create Redline Drawings?
In this article, I gave a basic overview of how we create redline drawings, but let’s dive deeper.
While we know how to create redline drawings, I also want to cover the digital approach.
The Basic Redline Drawings
The primary method uses a full-size (24×36) or ledger-size (11×17) drawing to document the changes using a red pen or pencil for markups.
It would be best if you kept the redline drawings in a location where they can be easily accessible but also won’t get lost. Your field supervisors and project manager should always know the location of the drawings.
If you lose your set of redline drawings, you’ll be in for a tough time when it you need to create the as-built drawings. You’ll burn a lot of hours trying to backtrack and figure out all the changes in the project.
When working as a general contractor, you may be required to keep and maintain a set of redline drawings on site. It’s a requirement from the specifications, and typically, you’ll submit your redlines with your as-built drawings.
As a young project engineer, I maintained the redline drawings. With someone with poor handwriting, this was a challenging task for me.
You’ll want to produce something neat and legible. Since these were not my strengths, it took me some time to get it done right.
Once you have the red pencil and physical drawings, you’re ready to start!
Let’s go over a specific example so you know what the redline drawing will look like.
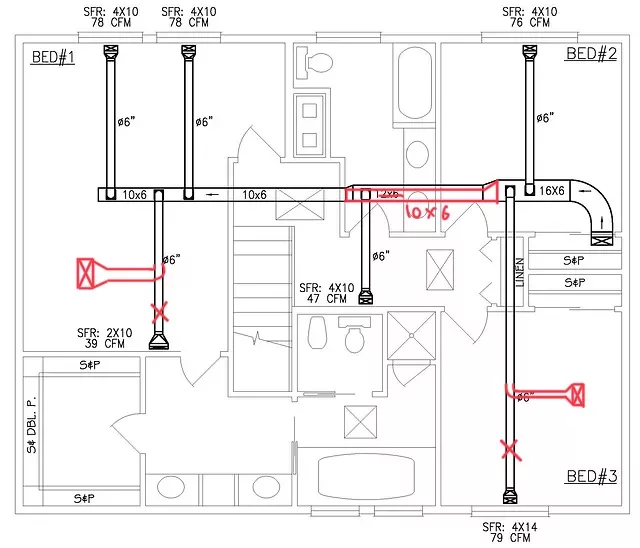
The image above shows an example of a ductwork system that had to undergo some modifications in the field.
Note this is not something I had experienced, but a fabricated example for the lesson’s sake.
For this instance, you couldn’t locate the supply grilles as shown in the design because there was conflicting work in the original location. Let’s say some light fixtures prevented the installation of the grilles.
So, the field crew rerouted the ductwork and supply grilles as needed. After completing the work, they must document the changes. You can see the changes with the red markings in the image above.
Here is the most basic example of a redline drawing. It is pretty simple, but you must ensure it gets done.
Using Software Options for Redline Drawings
As mentioned, keeping track of a hard copy of the drawings could become somewhat complicated, mainly if many different people handle it. Losing a set of redline drawings could make the project harder when it doesn’t need to be.
In our industry, we have the technology to make our lives much easier, especially for redline drawings.
Applications such as the Autodesk Construction Cloud allow you to store a digital copy of the construction drawings on the cloud. You and your project team all have access to the drawings, but not only that, you have a set of markup tools that you can use in the application.
With the markup tools you can make notes on the drawings, but you can also make markups that everyone on your team can see.
The image below is a screenshot from the application that we’ve looked at. You can see all the options you have for markup tools.
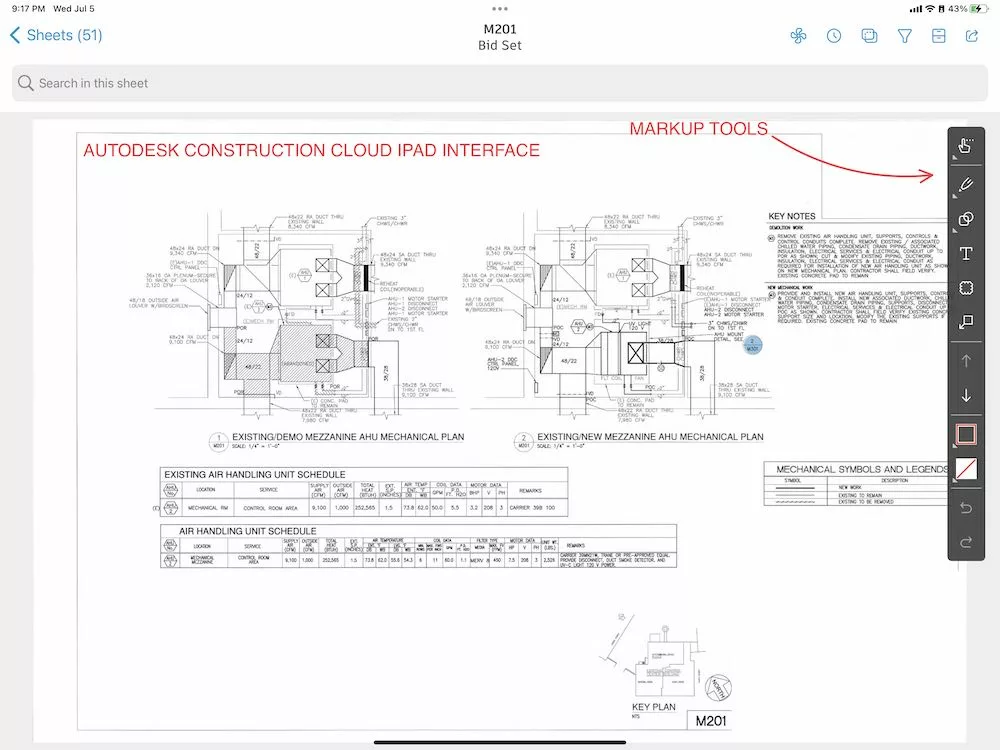
There’s also the capability to quickly link different documents to a drawing sheet for people to refer to in the field. You should visit the Autodesk Construction Cloud website to learn more about their services.
I’m not affiliated with Autodesk; I’ve just grown to enjoy using their software in this industry.
Having this redline software available can be a considerable advantage, and if used correctly, you’ll save time and money!
I say “correctly” because you won’t get 100% adoption of the software. You’ll likely have some old-timers who are not very tech-savvy and will struggle to use the application.
If you don’t correctly use the software, you won’t get much value out of it. It will take some training to get your team accustomed to operating the program.
I’ve given you the most basic understanding of how you could create your redline drawings, but we should also cover some redline best practices.
Best Practices for Creating Redline Drawings
- Use clear and concise markings: The markings need to be easy to read and understand. If you think there may be any questions with what you have written down, correct the markups or make it more simplified.
- Be consistent with your markings: If you use one type of markup in one location, do not change it somewhere else in the redline drawings. Also, standardize your markups so your team can use them and understand the drawings easily.
- Date and sign the drawings: It’s good practice to write down your name and the date after the markup you’ve made. Not only is it good to record when it occurs, but the next person reviewing the drawings knows who to talk to when they have questions.
Conclusion
In our discussion, we understood the significance of as-built and redline drawings in construction.
Think of these drawings as invaluable references that navigate us through the changes made during the construction process. They’re crucial tools for managing future modifications or troubleshooting issues.
Moving to redline drawings specifically, they’ve proven to be essential. Markup your drawings in red to illustrate deviations from the original design; these drawings function as a real-time chronicle of the project.
The primary benefits? Minimizing errors, enhancing efficiency, and upholding quality.
We’ve also observed the shift towards digitalization in this space. With innovative tools from companies like Autodesk, we can create, view, and collaborate on redline drawings digitally. This transition offers convenience and security, although it requires specific adaptability to new technology.
In conclusion, whether you’re using traditional methods or venturing into digital, the importance of best practices cannot be overstated. Clear, consistent markings and proper attribution are the keys to effective redline drawings.
Remember, delivering a well-documented construction project ensures a successful build and lays the foundation for your professional reputation in the industry.
Table of Contents
