Have you ever thought about safety when it comes to construction work?
Between the dangerous activities and working with heavy equipment, these present a high risk of injury or fatality. Therefore, construction companies invest a lot of time and money into safety.
One method of improving job site safety is utilizing a pre-task plan worksheet.
Pre-task planning is a meeting between job supervisors, project managers, and the work crew related to job site safety. Pre-task planning meetings are done before any new or significant activity.
The pre-task plan form outlines the potential risks with the activities and reduces the chances of an accident. Your general contractors will usually be pushing for pre-task meetings.
I will provide a pre-task plan template for your projects in this article. Additionally, we will cover the template sections so you can fill them out independently.
Before we continue, I wanted to touch on the importance of safety from a financial stance.
OSHA found that companies pay about $1 billion weekly for workers’ compensation. So, being in the construction industry with many high-risk activities, reducing the chance of injury will save you money.
The Construction Pre-Task Plan Template
The image below contains the pre-task plan template form we will cover in this article.
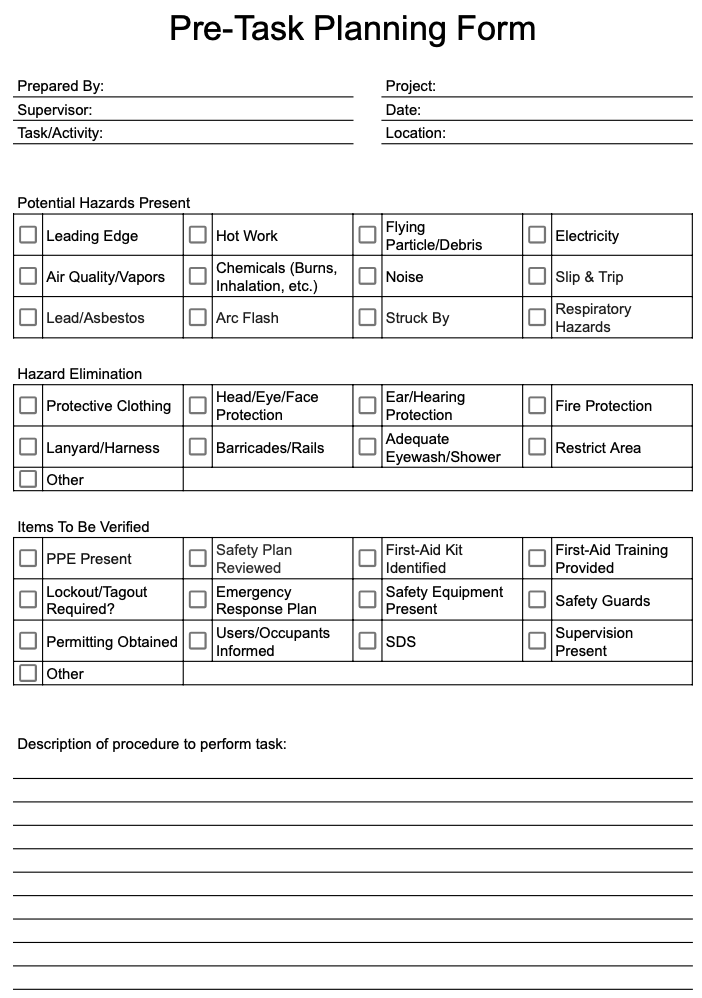
This form also has a back side to it, but more on that later in the article.
I have used this while working as a project engineer in the field. It’s effective in covering potential hazards and implementing hazard controls. NAVFAC also accepts this form if you work on federal projects.
You can use the template in a few different formats. In this article, I’ve provided you with two.
If you are using google sheets, know that this will be a “View Only” version when you click the link. To make your modifications, you must create a copy of the template.
Now that you have the template, let’s go over how to fill it out!
How to Use the Pre-Task Plan Template
Starting at the top of the form, we have some general information you must fill out.
- Prepared By: Include the name of the person who prepared the document to use during the pre-task planning meeting.
- Supervisor: This could be the same person who prepares the form, but this is only sometimes true. The supervisor will generally be the person overseeing the construction work. It could be the field engineer or superintendent.
- Task/Activity: Here’s where you write down a brief description or scope of work of the activity. For example, you can use terms such as excavation, electrical rough-in, or demolish ductwork.
- Project: The name of the project will go here.
- Date: Insert the date of the pre-task meeting.
- Location: Identify where the work will take place. It doesn’t need to be the exact location. Mention a room or work locations where the activity will take place.
Potential Hazards Present
You will use the following section to identify the hazards associated with the construction activity and worksite conditions.

There are many options to select from here. Let’s cover each item so you know if it’s applicable to your work.
- Leading Edge: A leading edge is an exposed area with a risk of falling. It usually relates to roofing work where you’re close to the side of the roof. It could also apply when working on a high rise that does not have outer walls installed.
- Hot Work: This is any work that uses an open flame for the activity. Hot work could be welding, cutting, grinding, drilling, soldering, brazing, and torch-applied roofing.
- Flying Particles/Debris: Some construction activities will generate dust or particles that enter the air. These particles can be hazardous to your health, so discuss the potential risks with your team.
- Electricity: It should be known whenever you deal with electrical components. You don’t want team members turning on breakers while work is in progress. There’s also the concern of having someone unaware equipment is live.
- Air Quality/Vapors: When it comes to construction, you could work with substances that create toxic fumes. You need to maintain a certain level of air quality to work safely in the space. There are tools you can use to monitor the air quality to maintain safe working levels.
- Chemicals: Besides air quality, you need to be aware of the other dangers of chemicals. Chemicals can become an issue if ingested, spills on your skin, or in your eyes. You’ll need a plan of action if any of these incidents occur.
- Noise: Identify any activities that will generate excessive noise. According to OSHA, “Research indicates that regular 8-hour exposures can damage your hearing at 85 dBA.” Utilize the 2-3 foot rule to check if the sound level is below 85 dBA.
- 2-3 Foot Rule: You can use this rule if you don’t have a sound level meter. The rule requires standing about 2-3 feet from a coworker. If you need to raise your voice to hear each other, then the sound level is over 85 dBA.
- Slip & Trip: Inspect the working area and determine if anything presents a slipping or tripping hazard. It could be a slippery surface, or the work creates a trip hazard.
- Lead/Asbestos: Some materials in construction can contain lead or asbestos, a toxic substance. Usually, you’ll find this in buildings that are older. The EPA banned asbestos-containing products in 1989, so I assume a building contains hazmat if built before this year.
- Arc Flash: An arc flash is when an electric current leaves its intended path, traveling through the air or to the ground. An arc flash can be a serious injury or even fatal. When working on a critical facility (e.g., a hospital), you may need to open live equipment to avoid interrupting their operations.
- Struck By: A struck-by accident occurs when a person is struck against, by, or caught in an object or equipment. According to OSHA, the following hazards cause the most struck-by injuries: vehicles, Falling/flying objects, and construction masonry walls.
- Respiratory Hazards: Per OSHA, there may be gases, vapors, dust, mists, fumes, smoke, sprays, and fog. These can pose a health risk, making you sick or killing you if inhaled.
These are the more common safety hazards that you will experience on the job site.
Hazard Elimination
The following section involves finding ways to implement a hazard control measure to reduce the chances of an accident. The hazards identified in the previous section will direct your selection here.

- Protective clothing: Different clothing will be used depending on the potential hazard. The following activities will require specific protective clothing.
- Arc Flash Suit: Working on live electrical equipment requires an arc flash suit. The suit will protect your life if an arc occurs.
- Protective Coveralls: During hazmat abatement activities, you must wear protective coveralls. You can dispose of the suit following the removal of hazardous materials.
- High visibility vests: help drivers see people working. It works to prevent struck-by accidents.
- Head, Eye, and Face Protection: While the hard hat and safety glasses are standard on most construction sites. Some activities require the addition of a face mask. Activities such as:
- Welding
- Using a chop saw
- Operating a chainsaw
- Pouring, washing, or spraying chemicals or materials
- Grinding with a handheld heavy-duty table grinder
- Ear Protection: Hearing protection will be required when working in a loud environment or with heavy equipment. You have the option of using in-the-ear or over-the-ear type of hearing protection.
- Fire Protection: You must be prepared for a fire when performing hot work. Should a fire occur, you should be ready to put it out. You’ll need to keep a fire retardant blanket or fire extinguisher nearby for hot work.
- Lanyard/Harness: You should be equipped with fall protection while working near a leading edge. You’ll wear a harness and lanyard at a minimum; you also have the option to use a retractable lanyard. It will break your fall if you go off the side of a building.
- Barricades/Rails: Barricades prevent traffic through your construction site. Rails are installed at the roof’s edge to avoid any falls. Fall protection is not required if you install a rail on the side of a roof.
- Adequate Eyewash: You’ll need to check to make sure your eyewash station is filled and ready for use. Also, you can mix a solution with water to preserve it. Ensure it’s changed per the solution manufacturers recommendations and is safe to use.
- Restricted Area: Identify areas where only specific personnel can access the hazardous or secure areas. You want to protect individuals from exposing themself to a hazardous situation.
Items to be Verified
The following section will act as a checklist for your construction site. As you go through the options, ask yourself, “is this required?” Check the box if you answer “yes” to any of them.
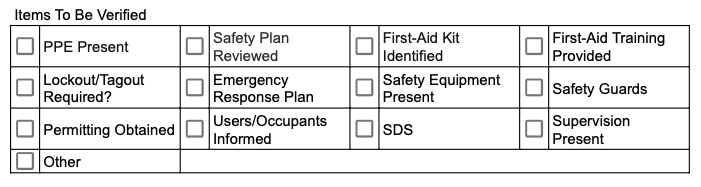
- PPE Present: PPE stands for personal protective equipment. If you find the construction activity has specific safety equipment needs, check this box. Otherwise, your hard hat, boots, class 2 vest, and safety glasses are your normal use of personal protective equipment.
- Safety Plan Reviewed: Each construction company should have a plan developed by a safety manager for when accidents occur. Some projects may even require job-specific safety work plans. You should review key points from the safety program to prepare team members for potential accidents.
- First-Aid Kit Identified: Every job site should have a safety kit for injuries. Review the location of the gear so the crew can quickly access it.
- First-Aid Training Provided: There should be someone on site who can administer first aid as needed. Once you confirm that someone has the necessary training, you can check this box.
- Emergency Response Plan: Similar to the emergency plan an immediate response is necessary when issues arise. You and your team will need to know the next steps once an accident occurs.
- Safety Equipment Present: Other than PPE, other forms of safety equipment are available for on a job site—items like a fire extinguisher, safety railing, LOTO kit, or air monitoring device.
- Safety Guards: Erection of guard rails on a roof or a barricade preventing access to a hazardous area are some examples of safety guards.
- Permitting Obtained: A unique task requires permitting to be obtained before you can perform the day’s work. Some activities that require permits are:
- Users/Occupants Informed: You should coordinate any activity that impacts the operations of a building. You will likely communicate with the building owner or facilities manager. They need advance notice of the work and the impact it will hold.
- SDS: SDS stands for safety data sheets and tells you the hazards of a substance. The document will also tell you what needs to be done if an accident occurs with the chemical. You must have a solution if it gets on your skin, eyes, or mouth.
- Supervision Present: If you’re working on a project requiring a full-time safety professional, check this box here. If not, then you’ll likely only require supervision during high-risk activities.
The final section on this first page will ask you to describe the construction activity. You can list out the steps you will take to complete the work.
It is especially important to list the steps for high-risk tasks. Someone reviewing the plan might
Final Questions of the Template
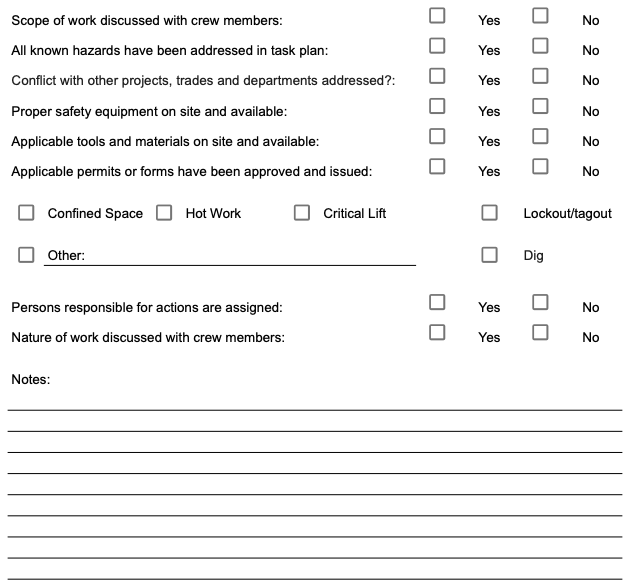
The questions on the back side of the form act as a final checklist after the meeting. If you have covered everything on the front side, you should be able to answer “Yes” to every question here.
There are some items here that we still need to cover. Let’s go over them now.
- Conflict with other projects, trades, and departments addressed: Coordination is vital in construction. Before you start any work, you’ll need to ensure the result does not affect other projects. Also, check that your work does not interfere with one another trade in the space.
- Persons responsible for actions are assigned: Some workers will have a specific task assigned. Make sure everyone is aware of who this person is and their responsibility.
- Nature of work discussed with crew members: Instead of describing the work they will perform, they need to know what type of work it is. Since various tasks are associated with specific hazards, covering this item is good.
Key Takeaway
Regarding the pre-task plan, the goal is to identify all the potential risks for a given task. Your team should have a clear understanding of the work assignment.
After identifying the associated risks, find ways to reduce the chances of the accident occurring.
Some guys might want to avoid sitting through the meeting, but understand that the pre-task planning will protect them and your company. If you wish for the success of a construction project, your biggest priority should be safety.
A lack of planning will only increase the chances of an accident occurring. The last thing you want is for OSHA to shut down your job or fine your company because you violated some safety rules.
Before you go, please check out my article on how to complete a daily report. Some of the safety work practices you learned in this article will carry over when completing the report.
Thank you for reading.
Table of Contents
