Can you recall the last time you walked by a construction site and they were just working on the land?
Did you ask yourself what’s going on? Where is the building?
Well, this is what we call sitework in the construction industry.
What is Sitework in Construction?
Site work is the activity of preparing land on a construction project for new buildings, underground utilities, and landscaping. The kinds of activities involved in site preparation are as follows:
- Excavation
- Grading
- Subgrade stabilization
- Foundation work
- Underground utilities
- Land clearing & grubbing
Let’s take a closer look at each of these activities’ involvement in a new construction project.
The Construction Sitework Activities
Before you begin site work, you need to start with surveying the land.
You conduct surveying to get an accurate representation of the land’s existing conditions. Do this so you know how much you need to dig or backfill for the job.
A surveyor will obtain this data by using a surveying tool. This allows them to measure distances, angles, and positions to develop a report of the conditions.
The survey results will act as your baseline for the project. Refer back to it when you need to plan the work.
Sitework Excavation in Construction
Excavation is a type of construction work that involves the removal of soil and rock. This work is typically carried out by the use of equipment such as a large excavator, backhoes, and skid steers.
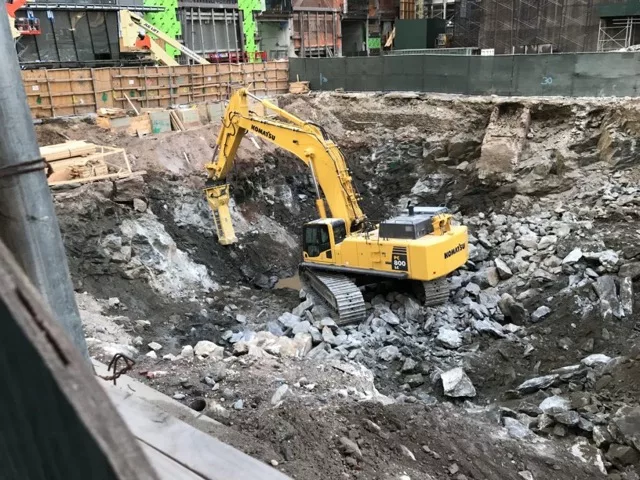
Large excavator using a hammer attachment to break large rock and concrete for removal – Photo was taken J A Montgomery at OpenLab At City Tech
Most site work will likely involve excavation, this is the primary method of removing soil to modify the land.
Removing a piece of land, allows you to install your underground utilities or set the foundation of your building.

Shoring is installed to prevent the sides of the wall from collapsing into the trench – Photo was taken J A Montgomery at OpenLab At City Tech
If you dig a trench greater than 5 feet, OSHA requires that you to install shoring. You prevent the trench from collapsing into itself this way.
The safety of site work is just as important as anything else on your job.
Important Things to Note During Excavation
During the excavation process, you may need a place to store your excess soil while site work is underway. While it’s stored, you need to make sure that it does not spread.
In other words, you need to cover up the soil to prevent it from being blown away. This can become an environmental concern if the soil is contaminated.
Using some plastic sheeting will be sufficient here.
I also suggest that you place the plastic sheeting below the excess dirt pile. You will save yourself the trouble of cleaning the mess beneath the pile once you move the excess soil.
Removing Soil From a the Construction Site
If you need to haul the soil away from the job site, some facilities may require testing of the material. They want to know that the soil is free from any contaminants before accepting it.
Soil can sometimes contain materials such as PCBs, arsenic, or petroleum products. If this is the case, then you will need to dispose of the material properly.
The disposal method of contaminated soil can be pricey and will likely result in a change order.
Grading of the Existing Land at a Construction Site
Site grading in construction is the process of reshaping land to meet the design requirements. Preparing the land to either bear the load of a building, change the landscape elevation, or provide erosion control.

Mini excavator used to back fill subgrade material for compaction
There are different types of grading activities when it comes to site work.
It consists of:
- Regrading: Changing the elevation of the construction site to allow for the installation of new irrigation systems, buildings, etc…
- Landscape Grading: Altering the earth to promote drainage of stormwater to filtration systems. The goal is to prevent pooling to avoid structural damage if water saturates and soften the ground below.
- Architectural Grading: Modifying the land to construct new homes over it.
- Rough Grading: This involves the removal of soil in the initial construction phase of grading or basic excavation. You begin shaping the land during this stage.
- Finish Grading: This is the final grading step to bring the land within the elevation tolerance specified in the contract plans. Once this stage is completed the landscaping contractor can begin their scope of work.
Subgrade Stabilization or Compaction of the Earth
By stabilizing the subgrade, you’re essentially preparing it to bare a load. This could be for a house, roadway, or concrete sidewalk.
Subgrade stabilization is critical to get right.
When mistakes occur, you end up with cracks in your concrete foundation which impacts the building’s structural integrity. This can become a safety and liability concern if someone gets injured or property is damaged.
The reason for this is that poorly compacted subgrade material will soften over time as the earth shifts. As a result, your foundation will begin to shift along with the subgrade which will cause cracking.
You need consider what will be the right equipment to use for compaction. Depending on the site conditions, you can use a heavy roller or jumping jack.

Use of a compaction roller is a great way to compact the subgrade material for the foundation to go down on
Know that if you’re using heavy equipment, this typically requires equipment operators. The operator needs to be certified to use said equipment.
Testing Methods for Sub-Grade Stabilization
To ensure that the subgrade will not be a concern, you can conduct compaction tests.
The test is done to let you know the soil compaction level. The machine will provide you with a percentage based on the density reading relative to the maximum soil density.
You will need what’s called a proctor to provide you with the details of your soil. It will give you information such as density at max compaction and the load-bearing capacity.
When you perform the compaction test, you want to get a reading of about 95%. This is a typical requirement set in design specifications.
I have personally seen a requirement for 99% compaction, but this was for an airfield.
Site Work and Building a Foundation
Once the subgrade has been completed, you can begin the next step of your site work. This involves backfilling with a base course or begin setting the foundation.
Your foundation will serve as the base support for your building or house. If the foundation and the land beneath it have not been properly prepared, you risk future damage to the physical structure.
A solid base should be one that is made up of steel-reinforced concrete foundations. It should be laid out in your plans on how the engineer wants the foundation constructed.
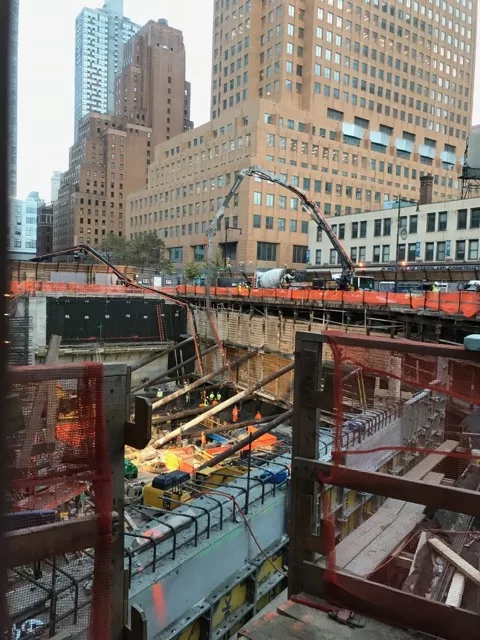
Pouring a concrete foundation with the use of boomtrucks which pump concrete into the pit – Photo was taken J A Montgomery at OpenLab At City Tech
Make sure that you’re looking at the details that have been included in the drawings. Refer to the specifications to see what type of rebar you will require. It should also tell you the strength of the concrete needed.
Tests Related to Concrete Work
There are two tests to guarantee the concrete meets the specified requirements.
- Concrete Cylinder Testing
- Concrete Slump Testing
Concrete Cylinder Test
A cylinder test involves pouring the concrete into small cylindrical containers. The technician will allow the concrete to harden for a specified amount of time. This time period is typically 7 and 28 days.
Once the waiting period is done, the concrete will be removed from the container for testing. It will be compressed until it breaks, then a technician will record the amount of force applied leading to the break.
This test determines the actual strength of the concrete.
Concrete Slump Test
The slump test was designed to gauge the workability of the concrete. Understand that concrete is typically a combination of different aggregates and water.
If the moisture content of the concrete is too high it will be difficult to mold to the form. You will have a hard time maintaining the desired shape of the concrete.
A low moisture content could indicate that the concrete may dry before you get it to the desired shape. Also, removing air pockets in the concrete using a vibrator would be difficult with dry concrete.
Air pockets in your concrete will be the first point of failure.
To learn more about slump testing click here.
Underground Utilities Installed with Site Work
Your underground (UG) utilities will follow the excavation work. The typical UG utilities consist of:
- Excess Stormwater Drainage Systems
- Electrical Wiring
- Gas Lines
- Sewage Lines
- Domestic Water Systems
You need to proceed with caution when installing anything underground.
I say this because you never really know what’s beneath the ground. There are methods of scanning the ground and pulling as-built drawings but this is not foolproof.
You need to constantly look out for existing UG lines because it could result in a catastrophic issue.
The most critical utilities you may encounter would be your clean water, electrical, and gas. Destroy any one of these and you could either get badly injured or cause a neighborhood to go without some utilities for a few hours.
A friend of mine does a lot of work installing underground utility work. I can’t even count the number of times he told me they struck an unforeseen utility line.
Each time they struck something, the job would shut down and the utility company came out to perform the repairs.
An Example of Site Work: Installing Underground Utilities
The general contractor I worked for was responsible for installing an emergency generator. This required a significant amount of electrical wiring underground.
Excavation Required to Install Utility Lines
The top surface contained concrete, which had to be cut into small pieces for removal. After that, the excavation of the base course and subgrade could begin.
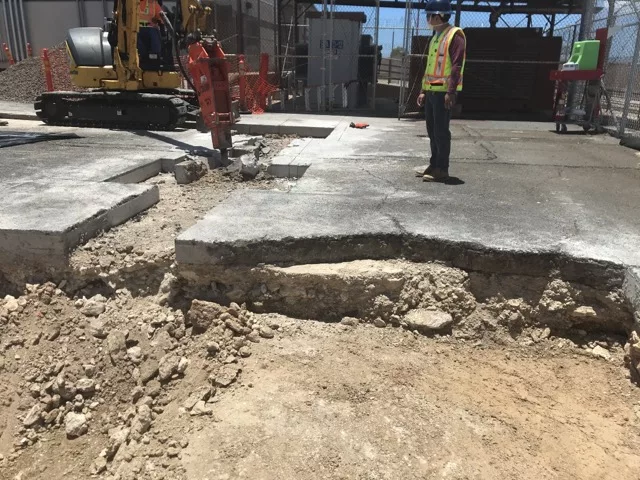
Hammer attachment was used to break apart concrete that was found during excavation
Any material that was removed from the site was stored outside of the construction area. We placed it on a plastic tarp and surrounded it with wattles.
We also covered the soil to prevent it from blowing away into the environment.
The wattles are used to filter any runoff from the concrete and soil if it rains. You need to consider the environmental conditions and the impact your work could have.
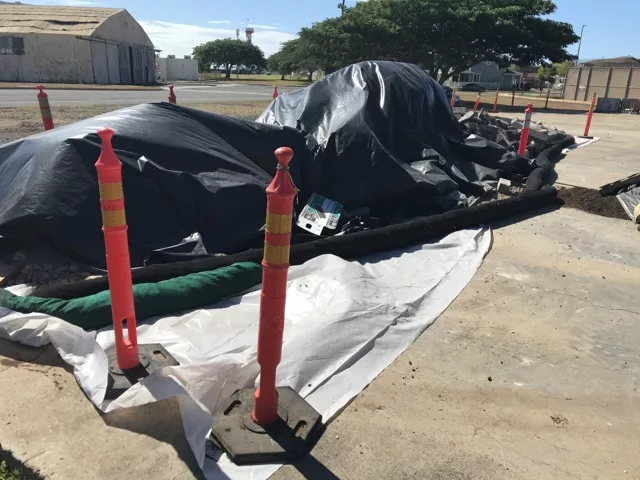
Any excess soil was stored in the laydown area covered by plastic and surrounded by wattles. This is to prevent the dirt from spreading and the run off from impacting near by drains.
Before excavation, we conducted some scanning to identify any existing site utilities. We found that there was a high-voltage line coming into the building’s power distribution system.
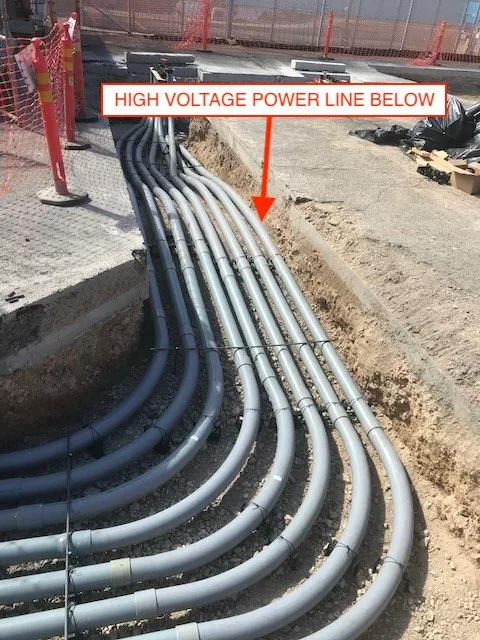
Electricians had to modify their conduit route due to a buried high voltage line.
Thankfully, we didn’t have to install our conduit below this power line. This saved the owner some time and money since no change order was required.
Under Ground Utility Installation
Now that all the soil and concrete were removed we could begin laying the new conduit.
During this time we also had someone come out to test our soil for removal from the building site. We needed to make sure it was free from contaminants.

Underground electrical conduit rough-in awaiting concrete jacketing
After the electrical rough-in was completed we began with backfill and compaction (i.e., sub grade stabilization).
Sub-Grade Stabilization Following Utility Installation
First thing, we needed to protect the new electrical conduit.
A concrete jacket was installed to cover up the conduit per the contract plans. We could then begin with the backfill activities.
Depending on the amount of backfilling required, you may need to do this work in several “passes”. Meaning you will need to backfill 6” of soil at a time and compact it to meet the specs.
Pouring the Concrete Foundation
Once the subgrade was compacted, one of the final steps was to pour the concrete foundation.
During the pour, we had a cylinder and slump test conducted for quality control purposes.
Then we poured the concrete pad. It then needed to cure to meet the strength requirement to safely set the new equipment.
We gave the concrete about two weeks to cure and proceed with setting the generator.
This was the extent of the site work required but the idea is to help you understand how they all tie together.
Key Takeaway
Understand that site work is an integral part of a construction projects. You’re literally setting the foundation for your project and the building to be built on.
Make sure you are familiar with all your local regulations for the different site work activities. There are many safety, environmental considerations, and quality requirements that need to be met on plan and spec jobs.
Before you go, consider checking out my article on rough trades in construction. You’ll get a better understanding of the rough-in process for underground utilities.
Also, before you perform any site work, you’ll need to complete a pre-task planning form. This will prepare you and your crew for the construction activity at hand.
Thank you for reading.
Table of Contents
